Wednesday, March 14, 2012

Kawasaki KZ1000P Motorcycle - Voltage Regulator Replacement

I've been having intermittent electrical problems on my Kawasaki KZ1000 P-19. At first I thought it was the battery, then the wiring or connections or maybe the rotor/stator (alternator) and finally settled on the voltage regulator. This link provides a pretty good step by step trouble-shooting guide for motorcycle electrical systems.

 The problem I was having was the battery would charge normally and bike would run fine most of the time but a couple of times it wouldn't start. The first time I got stuck out in the rain and sleet with a dead battery and had to call Betsy to give me a jump start I decided I needed to get my police bike back to it's old reliable self.

 These are the basic steps for checking out the electrical system -
Verify battery voltage is about 12.8 volts DC with engine off. 
Verify battery voltage increases to 13.5 volts DC to 14.8 volts DC with engine running. The voltage should increase as the RPM's of the engine increase. Turn on all electrical loads and verify voltage stays above about 13.5 VDC. It's about 13.5 VDC because the voltage of a fully charged battery is about 12.8 VDC, so the charging system needs to be slightly above that to keep the battery charged. If voltage is too low your battery won't stay charged and the bike will run off the battery - until the battery discharges to the point that it can't fire the plugs. If the voltage is too high you'll boil water off the battery and may burn out light bulbs. 
Do a visual/meter-aided inspection of wiring looking for shorts or grounds. 
Clean/tighten all connections. 
Check voltage at the three stator wires is above 50 VAC. 
Check voltage regulator diodes front to back ratio.
I ordered a new voltage regulator made by Accel from Amazon. It took awhile to get to me but the price was good and it works fine. You'll need longer screws to mount this regulator since the form factor is slightly different than the OEM regulator from Kawasaki. This is a link to the regulator - Accel 201411 Chrome Motorcycle Voltage Regulator for Kawasaki. The Accel regulator is less than half the cost of the OEM Kawasaki part (68 vs. 152 dollars)

A few notes -

The regulator is sometimes called the RR, short for regulator rectifier since it Regulates - keeps the voltage between 13.5 and 14.8 VDC, and Rectifies - changes stator voltage AC to DC. Stator outputs 50 VAC to the RR which outputs 13.5ish VDC to the battery, lights, horn etc.

The electrical power on this motorcycle is provided by a rotor - a wheel with permanent magnets embedded in it, that rotates inside a stator - a stationary circular piece with coils of wire mounted to it that convert the rotating magnetic field to electricity.

The removal and replacement of the regulator is (like other things on motorcycles) made difficult by lack of access. The regulator is mounted under the battery tray and it took me about 3 hours to get the job done. I'm really happy to have bright lights and I'm looking forward to riding my winter bike to work today.

Saturday, March 10, 2012

New Work Bench, Vise and Tool Box

I've been looking around for a workbench to replace the plastic topped portable table that I've been using in the garage. The workbenches available from Sears, Home Depot, Lowes and Harbor Freight are either expensive or flimsy and sometimes both.

I found an ad on Craigslist for a workbench and vise that I ended up buying for 100 dollars. It's a 6 foot Shure workbench manufactured in Missouri and a Wilton Columbian D45-M4 vise which is made in the USA as well. The table and the vise are both heavy duty and had been well used in an auto-body shop for years before being sold at auction. They were both covered in overspray from painting and the table had a lot of bondo drips on it.

I'm assuming a lot of people would look at the pictures on Craigslist and move on because the table and the vise looked pretty rough. I kind of thought they looked like diamonds in the rough. That Shure workbench is a few hundred bucks and prices can be crazy for a Wilton Columbian vise made in the USA.

After an afternoon of wire brushing and sanding, then another day of priming and painting, the table looks like this. That's a piece of left over vinyl flooring, I had laying around, on top of the bench to protect the metal top and keep tools from banging when I throw them on the bench.


I didn't paint the vise because I like the patina so I'm just wiping it with a little oil to keep the rust off. Both pieces had zero rust when I got them since they were kept in a heated shop and covered with coats of over spray.


The only problem with the vise is that one of the jaw inserts was missing. Those things are expensive if you can find them (hundred(s) of dollars) so I made one out of some aluminum bar. When I get around to it I'm going to get a piece of 3/8 by 3/4 aluminum and make some that look more store-bought. The one I made is three pieces of 1/8 inch aluminum stacked together. It works fine - but I'd like to have two aluminum jaw inserts. I have some 1/4 inch fillister head machine screws (smaller head than normal machine screws) that I got from McMaster Carr that will work for attaching the jaw inserts. For my first try and ground the heads down on some regular machine screws because my largest drill bit is 1/2 and the head diameter is slightly larger than 1/2 inch.

I bought this Craftsman tool box a couple of months ago. I couldn't find anything on Craigslist that seemed like a good deal so I went for the new one. It works fine but I liked having my tools laid out on top of the table...now I'm opening drawers looking for stuff. But it looks cool.

It's sort of funny to me that I've never cared to have a fancy tool box but have spent a fair amount of time in my life as an avid do-it-yourselfer using whatever tools/toolbox I happened to have and only buying tools when I need them. The shiny Craftsman tool chest replaces this tool carrying device I bought 40 plus years ago from J.C. Whitney. 


The rural part of Montana I grew up in didn't have much in the way of stores so I ordered a toolbox and some tools from J.C. Whitney to work on my bicycle, pickup, car, motorcycle, or whatever. It served me well and I sort of hate to get rid of it. I think that orange tape and the wood I used to reinforce the handle is from the 70's. You can click on the picture to enlarge it to see how beat up that thing is. 


Tuesday, February 07, 2012

Phillips, JIS and Pozidriv®

I always have assumed any screw that looked like a Phillips head was just that until I ran across this information regarding the JIS - Japanese Industrial Standard while reading the screwdriver notes in Cleaning the carbs 1 - Ninja250Wiki.

JIS screws may have a dot or "X" on the head to identify them. They are built to JIS 4633B-3/1991 and DIN/ISO standard 5260.

The Phillips head was invented by Henry Phillips in the 1930's to be used in assembly line production. Unlike the JIS drive, the Phillips drivers have an intentional angle on the flanks and rounded corners so they will cam out of the slot before a power tool will twist off the screw head.

The Phillips head tends to be fairly easy to strip particularly if the screw material or driver is soft or damaged. This was more of issue on motorcycles built in the 1960's but not so much anymore as Phillips/JIS screws have been replaced by hex head screws.

I was going to take a picture to show the difference between a Phillips and JIS screwdriver. There are subtle differences that don't show up well so I decided to just take a shot of the screwdrivers I got from IKASWEBSHOP showing the No. 2, 1, 0 and 00 screwdrivers.

Hozan JIS Screwdrivers by Jack Crossen
Hozan JIS Screwdrivers, a photo by Jack Crossen on Flickr.

I originally ordered some German made screwdrivers from Ames Supply Company in Illinois online but they called me back and have a 50 dollar minimum order policy so I went with the Japanese Hozan's from IKASWEBSHOP in Everett. They have sort of chintzy handles but I'm assuming the steel is good and they'll work fine.

The Pozidriv® is another common type of screw that looks like a Phillips. These are sometimes called drywall or deck screws. They can be distinguished from Phillips by 4 indentations on the head as shown in this photo.

Tuesday, January 31, 2012

Snow 2012

It started to snow in Everett on Saturday January 14th. I was at the gym when it started and within a half hour or so there was a few inches on the ground. It was fun practicing my winter driving skills in the empty parking lots. There were some cars getting stuck, a few pulling off to the side of the road and one motorcyclist who had done a low-speed get off.

 I took this picture on Tuesday looking off the front porch.

The two pictures below are after driving to the airport on Thursday January 19th in an ice storm. I'm holding the windshield wiper up to show the ice that was stuck to the blade. That ice made it hard to keep the window clean as the sleet/snow/ice fell. Combine that with a combination of drivers driving too slow for conditions, too fast for conditions and it was interesting to be on the freeway. I made good time though - most people were staying off the roads.


The snow, sleet and ice mixture was sticking to the underside of the fenders. No problems with traction but that low-riding Hyundai was getting close to high centering coming up the driveway since there's a natural hump in the middle of the drive.


This picture was also taken on Thursday January 19th. By this time we had 7 inches of snow on the picnic table.

I didn't get all the way to the airport since they cancelled B's flight (the third cancelled flight for her that day). Becca finally got her a flight at 8:30 pm and gave her a ride to the airport so everything worked out okay.

I enjoy the snow here with the exception that it's no fun to get stuck in traffic so I'm careful about where I drive when it starts snowing. Driving can be a challenge since this is a fairly hilly area, conditions can very widely within short distances, traffic can be heavy, people tend to not know how to drive on snow/ice and the snow tends to be heavy/slippery - no powder snow here that blows off the roads.

As I write this they are predicting temps into the high 40's or maybe 50 later this week with some sun and no precipitation for the first week of February.

Sunday, January 29, 2012

S10 Pickup Beltline Weather Strip Replacement

I didn't get around to taking a picture when I replaced the passenger side window beltline weatherstrip on my 1985 Chevy S10 pickup last weekend so I'm using one I had from a few years ago. The beltline weatherstrip is that rubber piece on the outside of the window that I have my hand on.
cruisencrossen by Jack Crossen
fisheye, a photo by Jack Crossen on Flickr.
The drivers side looks good because it doesn't get the sun like the passengers side has over the last couple of decades parked in front of our house.

The passengers side weatherstrip was falling apart and allowing rain to drip inside the door. I went to a couple of junkyards but couldn't find any better weatherstrip on the junk vehicles - plus I wasn't really sure how to remove that piece of weatherstrip without destroying it.

Turns out it's really easy once I got the new one and could see how it's fastened to the door. There are four or five metal tabs on a metal piece inside the weatherstrip that slide into slots in the door. Removing it is simple - I sprayed some WD-40 like stuff on it to soften it up and tapped it with big flat bladed screwdriver until it popped out. Installation is simply a matter of positioning the weatherstrip on the door and giving it a few whacks with your hand to seat it into the slots in the door. It slides under the side mirror housing on the front end and the vertical weatherstrip on the back end - so you don't have to remove either of those.

The passengers side beltline weatherstrip is Partslink Number GM1391119 which I purchased from Amazon for $16.78 plus tax (free shipping with Prime). You should verify but I believe that part fits any of the first generation (1983 to 1993) S10's.

Here's a cartoon showing the beltline weatherstrip. The inside is the piece of felt the window slides on and the outside is the rubber drip guard thingamajig that tends to disintegrate over the years. This gives you an idea of the metal tabs on the rubber strip at least.

I thought this information might come in handy to someone with an old S10 pickup. I'd read some discussions on the web saying this piece was very expensive/hard to find, you had to take out the window, remove the inside door panel and whatever...but it was so easy it was sort of disappointing because I'd planned for a multi-hour cuss-fest knuckle busting exercise. Took about 10 minutes - no swearing required.


Friday, January 06, 2012

Who Cares What I'm Doing?

Hi Monkey and Rachel by Jack Crossen
Hi Monkey and Rachel, a photo by Jack Crossen on Flickr.
What I've been doing since my last post. (By the way that picture has nothing to do with this text - I just wanted a picture and that one seemed like a good enough choice.)

Fixed a roof, fixed a fence, replaced a mirror and tail light lens on my pickup, visited a couple of auto junkyards multiple times, cut down a tree, dug out the roots, rode motorcycles most days, picked up and delivered a couch and chaise, got a new iPhone, talked to Siri (pretty useless but fun for a couple of minutes - I wish she could help me find my glasses and other stuff I misplace), worked on a lawnmower - ordered two new wheels (Snapper parts are expensive), got a free North Face 1/4 zip fleece from Moosejaw, ordered 75 dollars worth of misc. from Harbor Freight online (they sell cheap stuff - cheap), cleaned up garage, fixed a light in our bedroom, went to see the movie War Horse, made some potato soup, went to a designer clothing outlet mall a couple of days after Christmas (had to return a Wilson leather jacket that didn't fit B...don't go there unless you have to), joined Amazon Prime again for a free 1 month membership. I've been reading a variety of things as usual, watching some TV, cooking, shopping (mostly online) and trying to go to the gym on a semi-regular basis. I've been keeping busy.

I bought a copy of Pocket Ref 4th Edition with my Christmas gift card from Harbor Freight. If you've never seen that little book it's really interesting and has a wealth of information on a wide range of things, including how to give CPR to cats and dogs. It gets 5 stars from 178 reviewers on Amazon so other people think it's good too.

I'd say in summary I've been doing a lot things that are interesting to me and of no interest to anyone else. Blogs are good for that sort of thing since they can end up being diary-like and no one cares since no one reads them anyway. "Too many words didn't read" as someone says on the motorcycle forums I like to read. That strikes me as funny and really true - on the other hand I read several thousand words in a New Yorker article about an old man looking out his window through the seasons in New Hampshire and it was great - but that guy (Donald Hall - Poet Laureate of the U.S.) knows how to write.

In the last couple of weeks I replaced the passenger door outer belt weatherstrip on my 27 year old pickup, bought a digital micrometer, some JIS screwdrivers (Japanese Industrial Standard), and a big pair of channel locks. Repaired some cracks in the grout in the shower. Rode my motorcycles as much as possible.


_____________________________


On the other hand - I find this adventure story from a Danish couple that rode their 650 cc motorcycles from Prudhoe Bay to Ushuaia very interesting. They have a lot of pictures that are great and a good writing style that emphasizes the positive aspects of travel and meeting new people - plus they like licorice pipes so we have something in common. Their travel story is in the Advrider forums at Alaska to Argentina - N69S54A - ADVrider  and they have a blog N69° - S54° Americas | Going from Prudhoe Bay to Ushuaia on 2 motorbikes.

Saturday, December 17, 2011

Seattle International Motorcycle Show

Seattle International Motorcycle Show started yesterday and runs through Sunday at the Washington State Convention Center

 It's a beautiful sunny morning and predicted high today is 50 degrees. 

Motorcycles park for free.

 RTWDoug is at the show this year. This is his signature line from ADVrider -
2011 Magadan (I hope!) (03 Harley 1200 Dirtster)
2010 Europe and the Middle East (75 Harley Bobber)
2009 Around the World ('62 Harley Chopper)
2008 Europe (TDM and Guzzi Falcone)
2007 Europe (TDM850)
2006 Around the World ('48 Indian Chief)
2005 Europe and N Africa (KLR650)
2004 Europe (KLR650)
There's lots of pictures from the show at Motorcycle Show - PNW Riders.

Here's a random picture of my Sportster :-)


Friday, December 16, 2011

Bike's Looking Good

Our next door neighbor Drew has his traditional bike-in-a-tree Christmas decoration up and it's looking sharp.


Postscript 2012 - This picture makes me sad now...Drew drowned in a rafting accident on the Green River this Spring. He was a really nice guy and a good neighbor.

Sunday, December 11, 2011

Black & Decker Workmate 425, Motion Sensor Light, Sawzall

I picked up a Workmate 425 on Craigslist Friday for 35 bucks. It's in good condition and they go for about 100 dollars new so I think that was a fair price. I thought they were kind of a joke when they were advertised on TV years ago - a gadget they were trying to sell as a gift - but not really useful for much. I was wrong - it's really a smart idea. Even if was just a portable sturdy table with a wood top it would be handy.


The Workmate folds up small, has horizontal, vertical and irregular shape clamping ability, will hold 550 pounds and is easy to pick up and move around. I spent many years finding places to cut wood - on a deck edge, pickup tailgate, on a chair or between two chairs, and sometimes sawhorses if I had enough work to do - to justify getting those out and putting them together.

I made a sacrificial top for my Workmate with some scrap 3/4 inch plywood and a 1X2. I'm going to varnish that top just to make cleanup easier since my idea is to use that top when I'm doing mechanical work, yard work type things, painting or other jobs that would get the top of the Workmate dirty or scratched. I cut the plywood a little bigger than the OEM top and screwed/glued the 1X2 on the bottom to give the Workmate clamp something to grab onto. Now I have a sturdy table I can use to hold tools etc when I'm working in the yard, on a car or a bike outside.

 I used my Workmate to hold the plywood while I cut it and two nice advantages were apparent -
1. I didn't have a bunch of sawdust to clean up because I could set the Workmate in the driveway and 2. Having the plywood firmly held in place made it a lot easier to make a clean/straight cut.

Workmate will be handy for drilling as well - the center piece of the top is removable so there's no worry about drilling into your workbench/chair/tailgate/deck.

Ron Hickman invented the Workmate in 1961 but it wasn't until 1972 that Black and Decker began to mass-market it. Ron Hickman also designed the Lotus Elan sports car.

This is a video of an British guy showing how to use a Workmate -


 ____________________________________


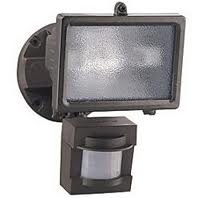
I installed a new motion sensor light in the alley behind the garage yesterday. Nothing special about it other than it works and was simple to install and adjust. The old one was about 20 years old and the sensor was getting so cloudy it couldn't see anymore. I took the sensor off of it, twisted some wires together, added a switch I had laying around and now I have a dual bulb spotlight mounted in the garage to give me more light when I'm tinkering in there.


The motion sensor I installed has a 150 Watt halogen bulb and cost a little over twenty bucks. If it lasts 20 years like the old one I think it's quite a bargain. It's the Heath Zenith SL-5511-BZ from Amazon.

_____________________________________


I'm looking forward to getting a Milwaukee Sawzall I ordered from Amazon later this week. It's the Milwaukee 6519-31 which has a 1 1/8 inch stroke. The other model in that price range is the 6509-31 with a 3/4 inch stroke. I also bought a set of 5 Pruning Blades and a set of 9 general purpose Wood and Metal Cutting Blades.


My main goal for this saw is to cut down a Photinia shrub/tree in our backyard. You've probably seen those trees before - they are very common in landscaping around McDonalds, office complexes, malls and places like that. They have red leaves and grow pretty quick. Depending on how you prune them they can be more tree-like or bush-like. The one we have is more dead-like. It has some kind of rust/fungus/blackspot on it. I heard Ciscoe say that's pretty common for those and there's nothing you can do about it. So I'm going to dig around the bottom of it and see how close to the ground (or how far below ground) I can cut it.

Sounds fun.

Those Sawzall's are cool for demolition work too - they'll cut through nails and electrical wiring and stuff real quick. Make sure you want to demolish those things before getting too carried away.

I'm looking forward to using the Sawzall as a hacksaw for cutting pipes, bolts and other metal bits. Cutting with a hacksaw can be pretty slow - I figure I'll save about 10 minutes of sawing time every few years by having a quicker cutting method. More recliner time.

Milwaukee Electric Tool has been making the Sawzall since 1951. Some people might call the ones sold by Ryobi, Craftsman, Dewalt - a Sawzall - but they aren't the real deal. Calling a reciprocating saw a sawzall is like calling a circular saw a skil saw, plastic tape - scotch tape, adhesive strips - bandaids..etc..

Tuesday, December 06, 2011

Whidbey Thanksgiving 2011

This a collage of the photos I took over Thanksgiving at Useless Bay on Whidbey Island. You can click on it to go to the Flickr set of photos. We had a really nice relaxing time with people, dogs, rain, wind, some sun, games, and a variety of good food. The house had lots of room for sleeping/relaxing/lounging, the kitchen was large and well stocked with all the pots, pans, and utensils we needed for cooking. It was great being so close to the water. I got to ride my motorcycle on the ferry going over and back a few times which is always fun - makes me feel like I'm going on a trip. It seems odd but it costs less to ride a motorcycle on the ferry ($3.45) than it does to walk on ($4.50). All in all a really nice Thanksgiving - very low stress with everyone pitching in and no major cleanup to do when everyone left.

Sunday, November 20, 2011

New Vise Coming My Way

I've been looking for a small vise to use for my home handy-man/manic/maniac activities. I scored this beauty advertised in the 1924 edition of Popular Mechanics.

The vise was made by Goodell-Pratt (Makers of Mr. Punch) located in Greenfield, Massachusetts. The vise I'm getting is No. 161 with the 2 inch jaws. It was $2.60 back in the 1920's and I got it for about 8 times that via eBay.

This is a page from the 1926 Goodell-Pratt catalog showing the vise.


Saturday, November 19, 2011

SweeTango Apple

I'd never heard of the SweeTango apple until I read the article  "Crunch" by John Seabrook in this month's New Yorker. I'm looking forward to trying this apple, from what I've read they are sweet and crunchy, with maybe a hint of spice.

The SweeTango is a hybrid between the Honeycrisp and the Zestar. I don't recall seeing the Zestar apple around here - I think it's more of a local apple in Minnesota.

All three of these apples - Honeycrisp, Zestar and the SweeTango (sweet and tangy) were developed at the University of Minnesota. The picture below of some Sweetango apples on a conveyor belt is from Wikipedia.


Sunday, November 13, 2011

5 Dangerous Things You Should Let Your Children Do

Summary - in case you don't have 9 minutes to watch the video. You should let your kids play with fire, use sharp knives, throw spears, take apart appliances and drive a car. This gives them a chance to learn how things work and how to use them safely.

Children raised in an over-protective  hyper-safe environment have no chance to learn self-protection skills - increasing their chance of being seriously injured when they encounter potentially dangerous things outside the home, or growing up to be overly cautious fearful adults.

Across the Country on a Honda C70 Super Cub

Across the Country on a Honda C70 Super Cub - ADVrider I love these stories where someone takes an old cheap motorbike on a long trip. This guy is 18 years old - riding an old Honda moped, that he fixed up himself, from California to New York with a budget of 600 dollars. Top speed 35 mph. Dangerous? Yes, but totally awesome. He's got some writing skills too.

This isn't his bike but this is what a Honda C70 Super Cub (also called a Passport) looks like.

It's got a 72 cubic centimeter engine (4.4 cubic inches), about 5 horsepower, and gets 115 mpg.

I've posted a link to this one before Sydney to London on a moped called Dot - ADVrider it's quite an epic moped adventure as well.

One of the nice things about being young is you don't know what you can't do. An older person creates lots of rules about what they can't do and would think of all the reasons why riding a moped for thousands of mile is impractical, foolish, unsafe - and miss out on a great adventure.

Tuesday, November 08, 2011

Monty Python's Spamalot

I'm looking forward to seeing the play Spamalot this Thursday at the Mt. Baker Theatre in Bellingham. Spamalot has been around for awhile now - it opened on Broadway in 2005, has toured in fifteen countries. This is the third U.S. tour.

The Mt. Baker Theatre is a nice venue, built in 1927 and designed by Robert Reamer who also designed the 5th Avenue Theatre in Seattle, Lake Quinault Lodge, the Old Faithful Inn and the Fox Theatre in Billings Montana - now known as the Alberta Bair Theater.

This is a picture of the theatre I took when we were there to see Arlo Guthrie and his family play.

Monday, November 07, 2011

iPad2 For B

Betsy's iPad2 is on it's way from China.

When I got the UPS tracking notice it said the iPad shipped from EPZ, China. I thought maybe EPZ was the English name of a city in China - but it's an acronym for export processing zone - a free trade zone where items are shipped without intervention of customs.

I think she's going to like being able to access news, some email, chat, games and whatever else the iPad has to offer. 

Thank you Steve Jobs. Amazing to me to think about the impact things he designed have on our lives. Point and click, touch screens, Google and Maps in your pocket (iPhone). Very cool stuff and real game/society changers in some ways.

She'll need to get the camera adapter so she can download photos and maybe one of those snazzy magnetic covers.


Monday, October 31, 2011

Best Riding Advice

P1020130 by Jack Crossen
P1020130, a photo by Jack Crossen on Flickr.
A good goal when riding a motorcycle is to keep the word "smooth" in mind when you stop, start, accelerate, and turn.  It's not too hard to lock up the wheels when stopping or spin the tire when starting/accelerating - so the "smooth" mantra helps.

Turning is a little different. Smooth is still good but it's not enough. On dry/clean pavement it's harder to lean the bike over to the point where the tires lose traction than some riders assume. The result of this is that when a rider enters a turn too fast, some accidents happen that could be avoided.

Two things can happen that cause this - (a) the rider applies the brakes non-smoothly in the turn causing loss of traction or oscillation and subsequent low side or high side crash or (b) the rider "gives up" or panics in the turn and stands the bike up thinking if he/she leans the bike over anymore it will slide out from under them.

The goal when entering a turn is to slow before the turn and then accelerate after the apex. It's possible to brake in a turn but it must be done with care and it's not something you want to practice the first time you go into a turn hot. Try some front/rear braking in a turn at slower speeds and see what it feels like.

In some rare situations it may be possible, and your only option, to stand the bike up in a curve and apply the brakes in time to stop or at least reduce kinetic energy. Examples would be road debris, an animal or a stopped car is in your path and there is no option other than to slow as quickly as possible.

The point of this post is that I wanted to repeat what I thought was one of the best pieces of riding advice I've read/heard/practiced.

When you enter a curve too fast and aren't sure if you are going to make it - KEEP LEANING.

The first line of defense is to not enter curves too fast of course. If you happen to get into a curve where you think you are going too fast, rather than giving up and running off the road or into oncoming traffic, keep leaning.

______________________________________


If you can ride on a dirt or gravel road it helps to get a feel for how the bike handles and brakes work (or don't) on a surface with less friction. When considering how to use your brakes during a turn on dirt or a slippery road it's of some interest to note that dirt flat track motorcycles originally had no brakes, since 1977 and to this day - they have only a rear brake. Those riders slide the rear wheel out to bleed speed in the turns. You probably won't be doing that on the street (and your front brake is your friend a lot of the time), but if you can get some experience riding a light bike on a dirt/gravel road or track that's great.

Growing up in Montana there were quite a few dirt roads. I never thought it was anything special to ride on a dirt or gravel road - it was just something you learned to do and put up with. I'd much rather ride on a smooth paved road, but every so often I like to ride on a gravel or dirt road to see what it feels like. The only problem is the nearest gravel road of any length is about 50 miles from my house.

To this day I remember riding my Honda 350 on a dirt road fourty years ago and coming into a corner too fast. I locked up the wheels and made a perfectly straight exit from the road and into a field - turned around and continued on to work. The part that sticks in my mind is seeing my perfectly straight skid mark through the corner and out into the weeds, and thinking - that wasn't very smart but at least I was lucky.

Now that I'm older and have used up a lot of my luck I try to ride smart most of the time - not always though. I'll do a few stupid things now and then just to keep things interesting or because it's fun. I have pretty good risk assessment skills so nothing obviously life-threatening. One of the advantages of age is you can choose your stupidity - not like when I was younger and did stupid stuff  fairly regularly with no real idea why other than it seemed like a good idea at the time.

If I have to ride a motorcycle at a sedate pace all the time, I'm hoping it's when I'm 80 something, but not quite yet.


Monday, October 24, 2011

Hot Water Heater Repair

I was feeling pretty good Sunday morning when I took this picture. Betsy had left me a note saying the hot water heater wasn't working and I had the parts to fix it in that plastic bag - so I thought.


Here's the long boring story...

When I tried to light the pilot light it wouldn't stay lit once I released the reset button. Most likely cause is the thermocouple (copper tube inside the plastic bag). That piece with the tubes and red wire sticking out of it is the burner assembly. The assembly is made up of - the burner (that rusty looking thing), a gas tube for the burner, another for the pilot light, a wire for the piezoelectric spark generator and another copper tube that holds the thermocouple. You have to take the burner assembly out of the hot water heater to remove the thermocouple.

 I was pretty happy that Lowes had a new "universal" thermocouple for about 7 bucks - until I figured out this particular Whirlpool hot water heater has (had) a unique thermocouple.

Little did I know that  this hot water heater is quite famous on the internet for it's thermocouple design. It was the subject of a Class Action, a couple of videos by a home handyman - Left Hand Thread Thermocouple Water Heaters and many web forums documenting Consumer complaints about Whirlpool Water Heaters.

Even though this water heater has quite a reputation on the internet - the people I talked to at Lowes don't know much of anything about the water heater or parts for it. I tried ever place I could think of and no one has this part. Whirlpool told me to tell Lowes I needed the "A" kit - most of the time the answer was - "what"? "You need A kit?" The Lowes in Monroe told me they had the "B", "D" and "G" kit but no "A".

 It's pretty disappointing to me that two brands I've associated with quality products - Whirlpool and Maytag have ended up being not so great. This water heater has worked fine for 6 years so I can't complain too much. The Maytag Performa washing machine (another Lowes purchase) would walk across the basement since it didn't have an out of balance switch - I was glad when it quite working for good. We rolled the dice and bought a Kenmore that's working fine (fingers crossed).

 This water heater has a 6 year warranty on it. The manufacturing date was the August 2005. Since I didn't have the original receipt and never registered for the warranty, the warranty runs from the manufacturing date.

Whirlpool doesn't make water heaters - they just put their brand on them. This water heater is assembled in Tennessee by US Craftmaster aka American Water Heater. I'm getting the new improved thermocouple overnight from the manufacturer in Tennessee. It should show up Tuesday afternoon. Even though I was a member of the class (for the class action suit), Whirlpool told me they won't give me the new improved thermocouple since my heater is out of warranty. If I had most any water heater than this I'd be able to fix it with a 7 dollar part - I'm paying 65 dollars for the part and overnight shipping from Tennessee. There's no local source.

___________________________________


A thermocouple is a device made of two dissimilar metals that converts heat into electricity. Using this property, the water heater thermocouple senses when the pilot light is lit and sends an electrical signal to the gas controller allowing gas to flow. The thermocouple sits in the pilot light flame on a gas hot water heater and outputs a small voltage (20-30 millivolts) when it's heated by the flame.

If you've ever lit a pilot light and wondered why the directions tell you to hold the "reset" button down for a minute - it's because you need to heat up the thermocouple so it generates electricity. The reset button bypasses the thermocouple but once you release it the controller needs to see the electrical signal from the thermocouple to keep the gas valve open.

The thermocouple in the Whirlpool hot water heater is unique in that (a) it has left-hand threads (lefty tighty) and (b) it has a fusible link inside a bulb in the copper sheath. If the material in the fusible link gets hot enough it melts, interrupting the electrical signal and shutting off the gas. This is a one-time event since once the fuse melts it's not repairable or resettable.

The reason for the left hand (odd-ball) threads on this thermocouple is the engineers who designed this water heater didn't want you to install a generic thermocouple - since they don't have the fusible link.

The new improved thermocouple doesn't have the fusible link - it has a typical thermal overload switch (resettable) mounted in the burner door and it has an adapter so you can use a generic right handed thread thermocouple.

Hot water heaters built since 2003 are sealed around the bottom where the combustion chamber is except for an air vent/flame arrester under the heater that lets air in but keeps flames from jumping out if you happen to spill gasoline near the gas hot water heater. The term for this feature is - flammable vapor ignition resistant or  FVIR. Suffice it to say with lots of safety features it's pretty hard to start something on fire with your gas hot water heaters nowadays.

I'm glad I like to learn how things work and fix things that are broken, but I'd like to take a hot shower without having to drive to the gym - so I'm hoping the parts show up tomorrow and the hot water heater  is working by tomorrow night.

__________________________________

The kit "A" showed up about 3 pm Tuesday and I had it installed an hour or so later. Taking the old burner off, installing a new burner jet, reusing the old piezo-electric starter, connecting the new pilot light pipe to gas controller, new main gas pipe to gas controller, thermo-couple adapter and it's wiring was all sort of interesting. I'd rate this job about a 2 on a difficulty scale of 1-5. It's probably about a 3 on a potential danger scale of 1-5 given the danger associated with natural gas leaks/fire/explosions.

The mercaptan (a thiol) added to natural gas makes it pretty easy to detect a leak with your nose - so if you smell that stinky rotten egg smell don't try to light the pilot light, shut off the gas supply, and find the leak. Natural gas is odorless without the mercaptan, but as a result of the New London School Explosion in Texas in the 1930's it was mandated by the Texas legislature and it's use spread around the world. The human nose is extremely sensitive to some thiols - for example the smell of a skunk can be detected at 10 parts per billion. I love Wikipedia...

 If you read the directions carefully, take your time and have some experience with tools, electricity, gas, pipes and stuff it's not a big deal. If that's not your thing I'd call a repair person.

One thing I like about working with your hands and head is the immediate unambiguous feedback that lets you know if you did a good job. The desired end result of this task is easy to define and measure - (a) don't burn down the house (b) don't  blow something or someone up and (c) have hot water.

No arguing, debating, speculating, guessing, just the facts - it either works or it doesn't. If only everything was so clear cut.


Saturday, October 15, 2011

The Thread of AWESOME!

I think the The Thread of AWESOME! at Adventure Rider has some cool, funny, weird stuff - like this awesome video about how an octopus can camouflage itself by changing it's skin color, pattern and texture.


There's a lot of different stuff people have posted on that thread; here are a few other videos that I thought were cool -

Brickies Labourering in Bangladesh
3D Printer
MikroKopter - HexaKopter.


Thursday, October 06, 2011

Riding Gear

I bought some replacement gloves recently. One pair is the Olympia Sports Monsoon Gloves for riding in the rain and another pair of Olympia Sports gloves that are vented for riding when it's hot.

I'm not particularly pleased with either pair. The fit of the Monsoon gloves felt good at the store, but now I realize the thumb on one is longer than the other. I bought those to replace a cheap pair of Tourmaster vented gloves I bought on Ebay - which I really like but were getting holes in them.

The lining of the Olympia Sports Monsoon gloves has a weird plastic feel that doesn't breathe and it is not sewn to the glove so when you pull your hand out the lining tends to come out of the glove, so it's hard to put the glove on again. The length of the glove is wrong too - they are a little too long to go under your jacket - but not long enough, or wide enough, to go over.

The vented gloves have bumps and lumps inside from the way they are constructed. I also saw a pair of gloves in Harbor Freight that were sold as mechanic's gloves that look very similar for 1/3 the price.

When you spend a lot of time on a bike, or ride in different weather conditions - hot/cool/cold/wet you need the right gear, so you are concentrating on riding and enjoying the ride.  Little things are important. Anyone who rides on two wheels knows that a piece of clothing that feels good when you are standing/sitting around can become a big distraction while riding if you end up getting wet, blisters, chaffing, too hot or cold.

Conclusion - I won't be buying Olympia Sports riding gear in the future. They may make some great stuff but I'm not going to take the chance.

I have some Firstgear pants, jacket and gloves that are great. Same for the Tour Master rain pants I have and the Harley Davidson jacket and boots. They aren't motorcycle specific, but the Frye leather boots I have work very well. They are comfortable leather, good protection and can be relatively waterproof with application of Sno-Seal.

I've almost worn out a pair of generic elk skin gloves that I wear a pair of gel cold weather REI bicycle gloves under - those have worked well. I have some deer skin gloves I bought at the Farmer's Coop with Seirus glove liners from REI that are nice and comfy too.

--------------------------------------

One little (or maybe not so little in the big picture) thing that bothers me about the nice Harley jacket I have is that it was not made in America. I was surprised to find that on the tag...but maybe it's too much to think leather jackets, or much of any clothing, will be made in the U.S.A. I think Frye boots are made in the U.S.A. but I don't know for sure - their website makes it seem like they would be. 

The deer skin gloves I got at the Farmer's Coop have a big American flag and U.S.A. on the tag - which I was happy about when I bought them. Turning the tag over, it turns out the gloves are made in China - the deer came from America.


Beartooth Highway by Jack Crossen
Beartooth Highway, a photo by Jack Crossen on Flickr.